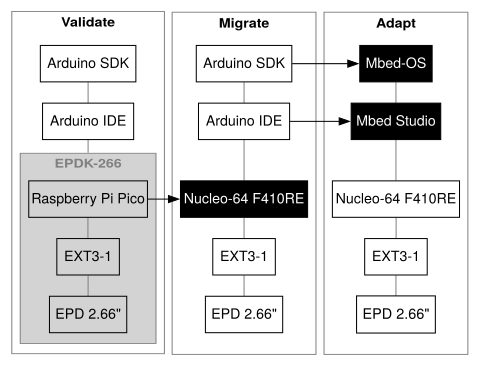
Migrate to another SDK
This application note details how to migrate from the Arduino SDK to another SDK.
The Arduino SDK supports a large range of boards. It is very likely that it also supports the new board.
The following procedure ensures a smooth transition from the Arduino SDK to another SDK or API:
-
Validate with the Arduino SDK;
-
Migrate to the new board;
-
Adapt to the new SDK or API.
Example
This example includes the following hardware and software configuration.
On the hardware side,
-
The initial hardware is the e-paper Pico development kit (EPDK-266) , which includes
-
The targeted controller board the STMicroelectronics Nucleo STM32F401RE board.
On the software side,
-
The initial SDK is the Arduino SDK running on the Arduino IDE
2.2.1, with- the RP2040 package for Raspberry Pi Pico boards
2.7.0, then - the STM32duino package for STM32 boards
2.6.0.
- the RP2040 package for Raspberry Pi Pico boards
-
The targeted SDK is Mbed-OS
6.17.0running on the Mbed Studio1.4.5IDE. -
The example
WhoAmI.inodisplays the name of the screen. The listing appears on the Screen page.
Validate
The first step consists on validating the screen and the connections with the Arduino SDK.
IDE and SDK
-
Download and install the Arduino IDE ;
-
Download and install the RP2040 package for Pico boards ;
-
Select the
Raspberry Pi Picoboard;
Board
- Ensure the connections are correct, for example according to Connecting the EXT3 to the Raspberry Pi Pico ;
Code
-
Select the
WhoAmIexample on the Arduino IDE by calling the menu File > Examples > PDLS_EXT3_Advanced_Fast > Common_WhoAmI; -
Check the screen
eScreen_EPD_266_PS_0Cand the main controller boardboardRaspberryPiPico_RP2040for theScreen_EPD_EXT3_Fastconstructor;
#include "PDLS_EXT3_Advanced_Fast.h"

Screen_EPD_EXT3_Fast myScreen(eScreen_EPD_266_PS_0C, boardRaspberryPiPico_RP2040)
- Build and link, upload and run.
The e-paper screen, the main controller board and the connections are validated with the Arduino SDK.
Migrate
The second step consists on migrating to the new board while keeping the same Arduino SDK.
- Keep the Arduino IDE;
Board
-
Download and install the STM32duino package for STM32 boards ;
-
Select the
Nucleo-64 STM32F401REboard; -
Ensure the connections are correct, for example according to Connecting the EXT3 to the STM32 Nucleo ;
Code
-
Keep the same
WhoAmIexample; -
Change the main controller board to
boardNucleo64for theScreen_EPD_EXT3_Fastconstructor;
#include "PDLS_EXT3_Advanced_Fast.h"

Screen_EPD_EXT3_Fast myScreen(eScreen_EPD_266_PS_0C, boardRaspberryPiPico_RP2040)
#include "PDLS_EXT3_Advanced_Fast.h"

Screen_EPD_EXT3_Fast myScreen(eScreen_EPD_266_PS_0C, boardNucleo64)
- Build and link, upload and run.
The new board and the connections are validated with the Arduino SDK.
Adapt
The third step incudes adapting the peripherals and the main controller board to the new SDK.
IDE and SDK
- Download and install the IDE for the new SDK, here Mbed Studio .
The peripherals library provides a light hardware abstraction layer to manage the GPIO, UART, SPI and I²C peripherals. It also provides miscellaneous functions for time and numbers, as well as synonyms for some functions.
The library hV_HAL_Peripherals exposes all the functions, with hV_HAL as prefix, to the other libraries and application code. It relies on the underlying library hV_SDK_Peripherals.
Warning
All the other libraries and the application code always call the functions from hV_HAL_Peripherals, with hV_HAL as prefix.
The library hV_SDK_Peripherals includes the limited set of functions, with hV_SDK as prefix, specific to the SDK. Using another SDK requires porting those functions.
| Section | Functions |
|---|---|
| General | hV_SDK_begin(), hV_SDK_exit() |
| GPIO | hV_SDK_GPIO_begin, hV_SDK_GPIO_define, hV_SDK_GPIO_write, hV_SDK_GPIO_read |
| SPI | hV_SDK_SPI_begin(), hV_HAL_SPI3_begin(), hV_SDK_SPI_end() |
| 3-wire SPI | hV_HAL_SPI3_define(), hV_SDK_SPI_transfer(), hV_HAL_SPI3_write(), hV_HAL_SPI3_read() |
| I²C or Wire | hV_SDK_Wire_begin(), hV_SDK_Wire_transfer(), hV_SDK_Wire_end() |
| Serial | hV_SDK_Serial_begin, hV_SDK_Serial_printf(), hV_SDK_Serial_crlf(), hV_SDK_Serial_print(), hV_SDK_Serial_println() |
| Time | hV_SDK_delayMicroseconds(), hV_SDK_delayMilliseconds(), hV_SDK_getMilliseconds() |
| Miscellaneous | hV_SDK_random() |
Warning
Using a new SDK requires porting the functions of the library hV_SDK_Peripherals, with hV_SDK as prefix
-
Port the twenty-four functions to the new SDK.
-
Proceed with unitary tests for each function.
Board
The hV_List_Boards header file defines the main controller boards.
- Adapt the targeted board to the new SDK.
The Arduino SDK uses the main controller board pins numbers while Mbed-OS requires the MCU ports names or the main controller board pins names.
The Arduino SDK uses the main controller board pins number 4.
///
/// @brief ST Nucleo 64, tested on Arduino and Mbed-OS
/// @note * Arduino SDK uses the main controller board pin number 4
/// * Mbed-OS requires the MCU port name PB5 or board pin name D4
/// @see variant_NUCLEO_F401RE.cpp
///
const pins_t boardNucleo64 =
{
    .panelBusy = 4, ///< EXT3 and EXT3-1 pin 3 Red -> 4 PB_5
    .panelDC = 5, ///< EXT3 and EXT3-1 pin 4 Orange -> 5 PB_4
    .panelReset = 6, ///< EXT3 and EXT3-1 pin 5 Yellow -> 6 PB_10
    .flashCS = 7, ///< EXT3 and EXT3-1 pin 8 Violet -> 7 PA_8
    .panelCS = 8, ///< EXT3 and EXT3-1 pin 9 Grey -> 8 PA_9
    .panelCSS = NOT_CONNECTED, ///< EXT3 and EXT3-1 pin 12 Grey2 -> 9 PC_7
    .flashCSS = NOT_CONNECTED, ///< EXT3 pin 20 or EXT3-1 pin 11 Black2 -> 10 PB_6
    .touchInt = 2, ///< EXT3-Touch pin 3 Red -> 2 PA_10
    .touchReset = 3, ///< EXT3-Touch pin 4 Orange -> 3 PB_3
    .panelPower = NOT_CONNECTED, ///< Optional power circuit
    .cardCS = NOT_CONNECTED, ///< Separate SD-card board
    .cardDetect = NOT_CONNECTED, ///< Separate SD-card board
};
Mbed-OS uses the MCU port name PB5 or the main controller board pin name D4.
///
/// @brief ST Nucleo 64, tested on Arduino and Mbed-OS
/// @note * Arduino SDK uses the main controller board pin number 4
/// * Mbed-OS requires the MCU port name PB5 or board pin name D4
/// @see variant_NUCLEO_F401RE.cpp
///
const pins_t boardNucleo64_F401RE =
{
    .panelBusy = PB_5, ///< EXT3 and EXT3-1 pin 3 Red -> D4 = PB_5
    .panelDC = PB_4, ///< EXT3 and EXT3-1 pin 4 Orange -> D5 = PB_4
    .panelReset = PB_10, ///< EXT3 and EXT3-1 pin 5 Yellow -> D6 = PB_10
    .flashCS = PA_8, ///< EXT3 and EXT3-1 pin 8 Violet -> D7 = PA_8
    .panelCS = PA_9, ///< EXT3 and EXT3-1 pin 9 Grey -> D8 = PA_9
    .panelCSS = NOT_CONNECTED, ///< EXT3 and EXT3-1 pin 12 Grey2 -> D9 = PC_7
    .flashCSS = NOT_CONNECTED, ///< EXT3 pin 20 or EXT3-1 pin 11 Black2 -> D10 = PB_6
    .touchInt = PA_10, ///< EXT3-Touch pin 3 Red -> D2 = PA_10
    .touchReset = PB_3, ///< EXT3-Touch pin 4 Orange -> D3 = PB_3
    .panelPower = NOT_CONNECTED, ///< Optional power circuit
    .cardCS = NOT_CONNECTED, ///< Separate SD-card board
    .cardDetect = NOT_CONNECTED, ///< Separate SD-card board
};
Code
- Adapt the code and change the main controller board to
boardNucleo64_F401REfor theScreen_EPD_EXT3_Fastconstructor.
On the Arduino IDE,
#include "PDLS_EXT3_Advanced_Fast.h"

Screen_EPD_EXT3_Fast myScreen(eScreen_EPD_266_PS_0C, boardNucleo64);
On the Mbed Studio IDE,
#include "PDLS_EXT3_Advanced_Fast.h"

Screen_EPD_EXT3_Fast myScreen(eScreen_EPD_266_PS_0C, boardNucleo64_F401RE);
- Add the
main.cppfile hidden by the Arduino SDK.
On the Arduino IDE, the Arduino SDK hides the main.cpp file.
On the Mbed Studio IDE, the Mbed-OS requires the main.cpp file.
// SDK
#include "hV_HAL_Peripherals.h" // for Mbed-OS

// Program
#include "WhoAmI.ino"

int main()
{
    setup();
    while (true)
    {
        loop();
    }
}
- Build and link, upload and run.
The new board is validated with the new SDK.